Saturday 25 February 2012

Revlon Grapefruit Fizz

When I was younger, maybe eleven or twelve, my friends and I were obsessed with gel pens. They were pens (obviously) that came in an array of colours, anything from pastel yellow to metallic green. We used to love writing with them at school - and even drawing on our skin with them. Our favourite thing about them, though, was that you could get scented ones. Grapes, bananas, apples...they had them all. We'd sniff these like they were crack.

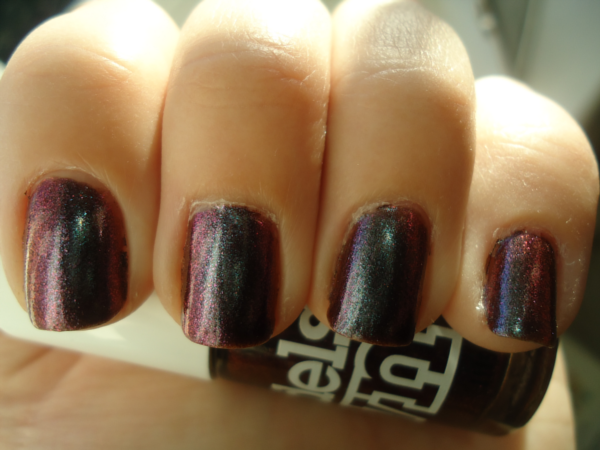
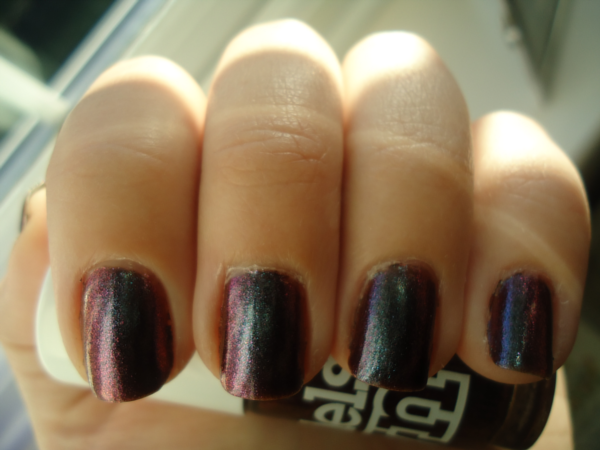
So you can imagine my excitement when I was in my local Boots the other day and spotted some of Revlon's scented nail polishes. I've never actually seen them in there before. They only had three colours/scents, Grapefruit Fizz (pink), Grape Fizz (purple) and Watermelon Fizz (red). I bought the first two, because I need another red nail polish like I need a hole in the head. I've used scented nail polishes before (more on that in another post) but they usual smell disgusting and make me feel nauseous. I've heard such great things about Revlon's scented polishes, however, that I decided to take a chance on them. Am I glad I did? Read on to find out.

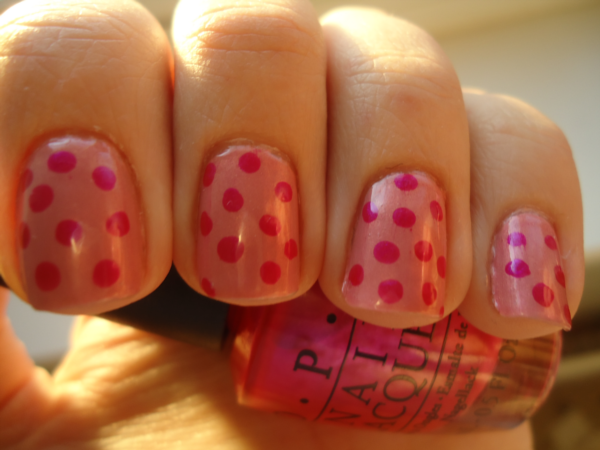
The one I'm showing you today is Grapefruit Fizz. It's a Barbie pink polish with large glass flecks. I could tell just from looking at the bottle that it was going to be very sheer, so I layered it over a coat of Models Own Baby Pink, which is, erm, a baby pink polish. Baby Pink is a bit paler than Grapefruit Fizz, but it's the closest match I own. I then did two coats of Grapefruit Fizz. The formula was so-so, a little thin perhaps, and I did have a bit of pooling on the cuticles. I immediately sniffed my nails afterwards (good thing I did it in the privacy of my bedroom or I would've looked really weird!). To be honest it smells more like a poor imitation of grapefruit than the real thing, but it's not an unpleasant smell. It's just generically fruity.

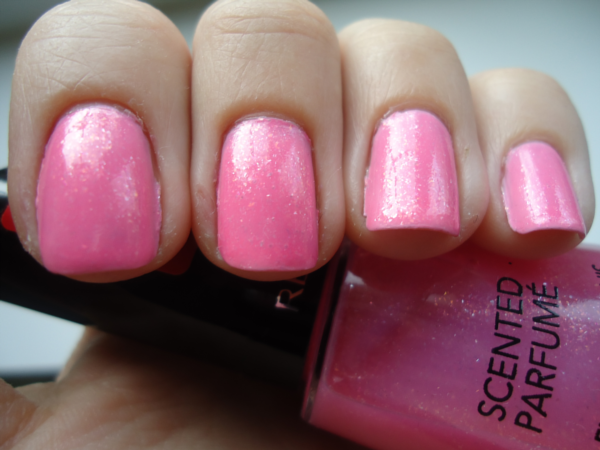
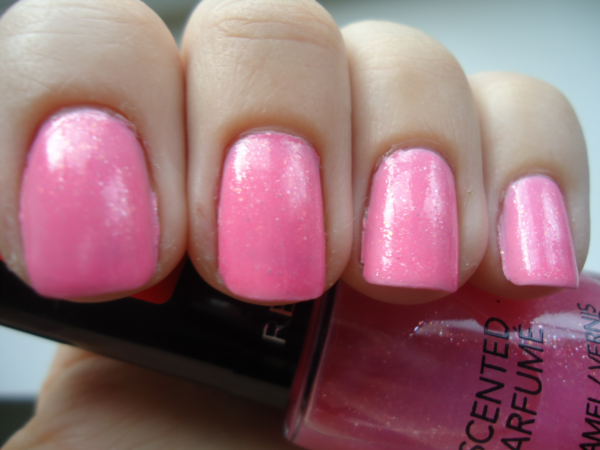
Yup, it's veeeeery pink. Perhaps a bit too pink for my tastes, but oh well. I put a coat of Seche Vite over the top for these photos, and I was surprised to find I could still smell the grapefruit afterwards. The scent lasted about two days before it faded completely - it would probably last longer if I hadn't used a top coat.

I thought these polishes were new for Spring 2012, but I've had a little look at some other sites and apparently these have been out since last year! They seem to be new to the UK, anyway, so you can probably find them in your nearest Boots right now. They're £6.49 each, but Boots has an offer on at the moment where you can buy two Revlon lip/nail products for £10.

Friday 24 February 2012

Foodie Friday: Vanilla Fudge

Happy Foodie Friday! Today I'm going to show you how to make vanilla fudge. I started making fudge in December last year when I was unemployed and broke (now I'm employed and, er, still broke). I couldn't afford to buy everyone amazing Christmas presents and, as I had so much free time on my hands, I decided to go the handmade route instead. It took a bit of practice to get the hang of making fudge, but with my tips and tricks, you'll be able to get it right first time!

I've tried a couple of different recipes in my quest to make perfect fudge, and by far my favourite is Hugh Fearnley-Whittingstall's from his River Cottage Everyday book. (Off topic: My mum and I adore Hugh Fearnley-Whittingstall - we watch all his programmes on the telly. Mum was devastated when he cut his hair short!) The recipe will make 35-40 squares. Like I said, it's Hugh's recipe, but my instructions.

Ingredients:
300g caster sugar
1 tbsp golden syrup
100g unsalted butter
100ml double cream
1 tsp vanilla extract

1. Using butter or margarine, lightly oil a 20x20cm (or similar) baking dish, and line the bottom with greaseproof paper.
2. Put the sugar, golden syrup, butter and cream in a heavy-based saucepan. You want quite a large saucepan as the mixture will bubble up a lot when it boils. Heat very gently and stir frequently until the butter has melted and the sugar has completely dissolved.
3. If you have a sugar thermometer, put it in the pan now. Turn up the heat and let the mixture boil hard - don't stir it at this stage, leave it to do its thing until it has bubbled up nicely. You need to do this until your sugar thermometer registers 116C/240F, which can take several minutes. If you don't have a sugar thermometer (I don't), fear not! Get a glass of cold water and add a few drops of the mixture to it. If you can form these drops into a ball with your fingers, and it flattens when you take your hand out of the water, the fudge is ready. This is called the 'soft ball' stage. Another clue as to when it's ready is that the mixture darkens a bit in colour. Take the saucepan off the heat and leave to stand for about 10 minutes.
4. Add the vanilla extract and beat the mixture hard. You need to do this for quite a while, 10 minutes or more usually, until the mixture thickens and becomes grainy. This is where my fudge kept going wrong - I didn't realise you had to beat it for quite so long, and I lacked the patience (and energy!) to beat it by hand for such a long time, so often my finished product was far too soft and just kind of...melted. I always use an electric whisk now and it's so much easier - you still have to whisk it for about five minutes, but it requires a lot less arm muscle!
5. When the mixture has thickened, pour it into your baking dish and smooth the top with the back of a spoon. Let it harden a bit before marking into squares, and leave to set for 2-4 hours.

So there you have it. A fool-proof fudge recipe. You can make your own variants too, like chocolate or pecan or cherry or whatever. For Christmas last year I put some in cellophane bags I bought from Lakeland and tied them with pretty ribbons to make thoughtful but inexpensive presents. Or you could just eat it all yourself!

Thursday 23 February 2012

Accessorize Aztec

Most, if not all, hardcore nail polish collectors love duochromes. And the one thing better than duochromes? Multichromes. The one I'm showing you today is an absolute beauty: Accessorize Aztec. It's apparently a dupe of Orly Space Cadet, but as I don't have that polish I'm going to review Aztec in its own right.

I tend to get so entranced by the pretty jewellery in Accessorize that I often forget they do make-up too. And interesting make-up, more to the point. Accessorize Aztec is a very special polish. Like I said, it's a multichrome. It has a purple base but flashes green, gold and bronze depending on the angle. The first coat went on really sheer and I was worried it would be difficult to build up opacity, but by the third coat it was perfectly opaque. The formula was brilliant, I didn't have any problems, although the width of the brush is narrower than I usually like. But really, I should let this polish speak for itself:

I believe this polish originally came out in 2010, but I picked it up in Superdrug late last year so there are clearly still bottles floating around. I think it cost me about £4 for a 10ml bottle, which is quite reasonable, non?

Tuesday 21 February 2012

OPI Banana Bandanna

Now that the weather is warming up a bit, I have a cheerful spring-inspired manicure for you today. OPI Banana Bandanna (what a mouthful!) is a buttery yellow that's not quite lemon and not quite pastel. I believe it was part of a summer collection OPI released in 2009, but I got mine free when I subscribed to Grazia magazine a couple of years ago (along with Done Out in Deco, Moon Over Mumbai, Oh So Glam! and OPI Por Favor). In the bottle it has a subtle shimmer, but this didn't really translate onto the nail at all. It's very sheer - I did a coat of OPI Alpine Snow first, and Banana Bandanna still needed three coats before it was opaque! Gah.

My mum's comment when she saw my nails was that it looked like I'd dipped them in custard. (My grandmother was less poetic and just said it looked awful.) Charming. As you can see, I added a little bow to my ring finger. This is a water decal I bought in a set on eBay here. They're really cute and very easy to apply.

So there you have it! A quick and easy spring manicure that's bound to turn a few heads - if only because they think you've dunked your hands in custard...

Sunday 19 February 2012

Nubar Reclaim

Nubar Reclaim is the only linear holographic nail polish I own. It's a little ironic that it's green, given that green is one of my least favourite polish colours to actually wear (yes, I am aware I'm committing sacrilege as far as some people are concerned by stating this!). However, I have to say I'm a little bit in love with this green. It was released as part of the Going Green collection in 2009 and is, thankfully, still readily available to buy (I got mine here). Let's take a look at it:

Isn't it pretty? All but the last photo were taken in natural light; the latter was in artificial light, which shows the holographic effect best. There has been a distinct lack of sunlight here recently, so I can't show or tell you how well it shows up in the sun, but I imagine it looks amazing.

Saturday 18 February 2012

OPI Swimsuit... Nailed It!

I wore this manicure a while ago on my birthday (28 December, in case you're wondering!) but forgot to post it sooner. I did two coats of OPI Swimsuit... Nailed It! from last year's Miss Universe Collection. It's a gorgeous, bright blue foil. Blue nail polishes make me happy, and this one makes me happier than most. To bling it up a bit, while the polish was still wet I stuck on some silver stars from a Frontcover nail art kit.

Cute, isn't it? It actually ended up reminding me a bit of the stars on the American flag. There was only one problem:

Yup, it's a stainer. I knew this before I painted my nails, but I thought hoped that because I used OPI Natural Nail Base Coat first that I might get away with it. Apparently not. A month and a half later my nails still have a bit of blue on the tips!

Thursday 16 February 2012

Honey, I Shrunk My Manicure

This was originally going to be a post on one of Nubar's duochromes, Moon Shadow. And it still is...kind of. But mostly it's now a warning on what not to do with your nail polish!

There is some confusion about the name of this Nubar duochrome. Originally called Moon Shadow, it's now listed on Nubar's website as Moon Eclipse, and on Beauty Bay as Moon Shadow Eclipse. I've done some Googling and it's definitely the same polish, just retitled. As for the colour, it's a rich purple duochrome that flashes bronze, gold, and even a little green. It's really pretty. I found it a little sheer, however, so I used three coats on my nails. I then did a coat of Seche Vite to seal it...and herein lies my problem.

I started using Seche Vite late last year, and I love it. It dries in a matter of seconds and keeps my manicure looking perfect for days. I've read on other blogs that it can cause shrinkage, which is where the nail polish underneath shrinks and pulls back from the tip of the nail, but I'd never experienced this myself until yesterday. Here's what I mean:

See what looks like major tipwear? That's actually where the Seche Vite made my manicure shrink. I took these photos about an hour after applying Nubar Moon Shadow, and already it looks like I've been wearing it for days. Not cool.

The good news is that I figured out why this happened, so I can prevent it from happening again and impart my wisdom to others. Normally when I apply a top coat I wrap it under the tip of my nails, as it seems to make my manicure last longer. It also appears to prevent the Seche Vite from shrinking, presumably because it means the Seche Vite has nowhere to actually shrink back from. For some reason I didn't do that this time, hence the craptacular manicure.

To see better photographs of Nubar Moon Shadow/Eclipse go here, and for more information on how to get the best out of Seche Vite, go here.

Monday 13 February 2012

Valentine's Day Mani #3 - Hearts

i carry your heart with me (i carry it in
my heart) i am never without it (anywhere
i go you go, my dear; and whatever is done
by only me is your doing, my darling)

- E. E. Cummings

Well, I couldn't have a Valentine's Day manicure without hearts, could I?!

I have a confession to make: I cheated with this manicure. I was going to freehand hearts on my nails, but I ran short on time so I decided to use Nicole by OPI Step 2 the Beat of my Heart instead. But I'm getting ahead of myself. I started with three coats of OPI Done Out in Deco. I initially did two, then added a third coat because when I looked reaaaally carefully, I could see a bit of VNL. Done Out in Deco is a lovely blue-toned lilac creme with a slightly dusty grey finish. I love lilacs anyway, but this one is especially pretty and spring-like (OK, it's not actually spring yet, but a girl can dream, can't she?). I have to say, the formula was an absolute dream to work with - painting my nails with it was a breeze.

My application of Nicole by OPI Step 2 the Beat of my Heart was another matter. It's pink and purple glitter hearts in a sparkly base. The hearts were a nightmare to get out of the bottle, so I actually ended up doing a coat of just the tiny opalescent glitter first, then used a cocktail stick to get the hearts out and put several on each nail. I'm pretty chuffed with the result, but the hearts really were a pain in the arse to work with.

What are your Valentine's Day plans? I'm single this year, so I'm spending it with my darling Claude (whether he likes it or not!). I cut cucumber and carrots into little heart shapes for him and everything!

Valentine's Day Mani #2 - Pink Polka Dots

I hold it true, whate’er befall;
I feel it, when I sorrow most;
‘Tis better to have loved and lost
Than never to have loved at all.

- Alfred, Lord Tennyson

Today's manicure is one I really enjoyed doing, and it's very easy to recreate. It's good ol' polka dots with a Valentine's twist.

I started with two coats of Orly Super Natural, a dusty pink with a kind of peachy shimmer. I don't wear pink nail polish very often, but I decided if ever there was a time to do so it was Valentine's Day! This is the kind of pink I really like - it's flattering on all skin tones, and the shimmer gives it added interest. It would be great for people who can't get away with wearing outrageous polish at work, but still want to wear something a little different. Anyway, Super Natural was opaque in two coats and had an absolutely flawless formula.

I then whipped out my new dotting tools and used a medium-sized one to do random polka dots. I used OPI Pompeii Purple for this, the name of which is deceptive as it's actually hot pink with a purple shimmer. Again, the shimmer makes the polish more interesting than your standard pink.

I actually did this design before yesterday's Valentine's manicure, but for some reason I decided to post them out of order. I'm pretty pleased with how it came out though, I think it looks really cute without being OTT.

Sunday 12 February 2012

Valentine's Day Mani #1 - Red, Red Rose

Oh my luve is like a red, red rose,
That's newly sprung in June:
Oh my luve is like the melodie,
That's sweetly play'd in tune.

- Robert Burns

I made a pilgrimage to Colourcopia before Christmas and bought a bunch of nail polishes. For those who haven't heard of it, it's a store that sells an extensive collection of OPI and Nicole by OPI polishes in Westfield shopping centre. It is basically heaven. One of the things I picked up was the OPI & Serena Williams Glam Slam! US duo, so today I'm showing you Love is a Racket from it.

Love is a Racket is a cherry red glass fleck. The flecks are much more apparent in real life than they are in my photos, unfortunately. I used two coats for full opacity.

I don't wear many reds to be honest, but I really like this one as it's not a bog-standard red creme. And as Valentine's Day is only a couple of days away, I added nail stickers from Claire's to my thumb and ring fingers to make it a pseudo Valentine's manicure!

P.S. As you can see, I've filed my nails down to little nubbins! This wasn't entirely through choice; the nail on my index finger broke, so I had to shorten the others to make them match. Sigh.

Saturday 11 February 2012

Models Own Beetlejuice Collection

Today I have the Models Own Beetlejuice Collection to show you. I'm a little late to the party with this one - it originally came out last year, but it was sold out for a while so I've only recently got my hands on it (in fact, I bought it as a present to myself when I started a new job last month). In case you don't know, Beetlejuice is a collection of five duochrome polishes. I wore each of these as a full manicure for a few days so I could see how well they last.

Aqua Violet. A blue/purple duochrome. The colour shift was stronger in real life than it appears in my photos. I didn't like the formula at all, it was quite runny and pooled on my cuticles, but it only needed two thickish coats for full opacity. I adore the colour - I'm a sucker for blues and purples! Wear time was rubbish. I took these photos the day after I put it on, and it's chipped already!

Emerald Black. This was the least duochrome of all of them. Despite the name, I wouldn't say there is actually any emerald apparent in it. It's more a blackened base with teal shimmer. However, I rather like it regardless as I think it's a great twist on the standard black polish. I had no trouble with the formula of this one, and it was opaque in two coats.

Golden Green. I'm going to admit something a little controversial here: I am not a fan of green nail polish. Or green in general, actually. I have brown hair and blue eyes; green is not a shade that suits me. I hated this polish when I first put it on, and I was tempted to remove it immediately. I'm glad I resisted, though, as it definitely grew on me. It's a green/yellow duochrome that some have likened to Chanel Peridot. It's actually really pretty. Formula wise, unfortunately it was identical to Aqua Violet and was rather runny...and lasted equally badly. It also showed the brushstrokes when it dried. Sad face.

Pinky Brown. This a pink/copper duochrome with itty bitty glitter in it. It was thicker than Aqua Violet and Golden Green, so I liked the formula much more as a result. It only needed two coats, and it lasted about three days before it chipped. I really like this one. Doesn't it look like autumn in a bottle?

Purple Blue. A pink/blue/purple multichrome. It has the same glitter and formula as Pinky Brown, which was good. This is hands down my favourite of the collection. The colour shift on this one is incredible, particularly in sunlight. I wore this polish at the Museum of London recently, and I spent almost as much time looking at my nails as I did the exhibits!

Overall, I'm really impressed with the Models Own Beetlejuice Collection. Despite the rubbish formula on a couple of these polishes, the colours are beautiful, interesting and - dare I say? - quite unique. I will definitely wear them all again (even Golden Green!).

I bought these polishes on the Models Own website. They retail for £5 each, or £20 for the set of five plus a 3-in-1 top coat. Very good value, oui?