Showing posts with label Jubilee. Show all posts

Tuesday, 5 June 2012

Jubilee Nail Art Series #3: Water Marble

Hello all! Can you believe it's the last day of the Jubilee already? I've got something special for my nail art series finale - a water marble! You may remember I've done a couple before, and I'm definitely improving with each one I do. I decided to do it using the colours of the Union Jack, and it so happened that they were all OPI polishes because they seem to work really well for water marbling. The white is Alpine Snow, the red is Tasmanian Devil Made Me Do It, and the blue is Dating a Royal (also used in yesterday's post).

You can find my previous water marbles here and here.

Monday, 4 June 2012

Jubilee Nail Art Series #2: Crown It

Hellooo. Today is the second day of my nail art series inspired by the Jubilee. Did you know that this is only the second time in history that a British monarch has had a Diamond Jubilee? The other is Queen Victoria. And the longest reigning monarch ever was Sobhuza II of Swaziland who reigned for 82 years, 254 days! (Can you tell I've been Googling my little heart out...?)

Anyway, back to nail polish. Today's design is actually my favourite of the three. I'll show you the photos first:

I used OPI Dating a Royal as the base - with a name like that, how could I not?! The design on my index, middle and little fingers is a crown, which I drew on with a small nail art brush using Barry M Gold Foil. I wanted the crowns to be a kind of repeating design, which is why there are some partial ones. My ring finger has an accent nail of a larger crown comprised of individual pieces of glitter that I placed on using a cocktail stick - yes, it was as much of a faff as it sounds! I wanted to use gold but I didn't have any to hand, so it's actually orange glitter. (Shhh, don't tell anyone!) I used a rhinestone as the diamond at the top.

The Jubilee baking went really well at work today. Between the two of us, my coworker and I made bread, jam tarts, fairy cakes, cheese straws, chocolate biscuits, fruit scones and summer pudding. I've never baked for a whole day before, so it was tiring but really enjoyable! I think the public really liked being able to come into our historic kitchens and actually see/taste food being cooked in them. Tomorrow I do it all over again!

Sunday, 3 June 2012

Jubilee Nail Art Series #1: Flying the Flag

Hello and welcome to the first of three Jubilee manicures posts! If you don't already know that the Queen is celebrating the 60th anniversary of her ascension to the throne this year...err, then what rock have you been hiding under?! I showed you how to make easy Jubilee cupcakes on Friday, and today I'm demonstrating my Union Jack nails. Photos first, I think:

The glitter is a new one from Nails Inc released especially for the Queen's Jubilee - called, of course, Jubilee! Inspired by the colours of the Union Jack, it's comprised of red, blue and silver glitter. It's really densely packed - my photos show one generous coat over OPI Alpine Snow, a white creme. It comes with Nails Inc's distinctive crystal cap, and while I have a lot of Nails Inc polishes, this is my first with this cap. LOVE IT.

I also chose to do an accent nail of the Union Jack itself using some water decals I bought on eBay. It was very easy to apply, but unfortunately it didn't last very well - after only a couple of hours, you can see that it's fading at the tip of the nail despite the top coat I put over it. Nonetheless, I really liked this manicure and I got a ton of compliments on it when I wore it to work yesterday!

I'll let you in on a secret: I've had to do my three nail art designs in advance because I'm helping with the baking for a 1950s-style tea party at work (which is an historic house, so we're open to the public for the Jubilee). It means I can't actually wear nail polish today and tomorrow. *sob* I genuinely can't remember the last time I had bare nails for longer than an hour or two!

Friday, 1 June 2012

Foodie Friday: Jubilee Cupcakes

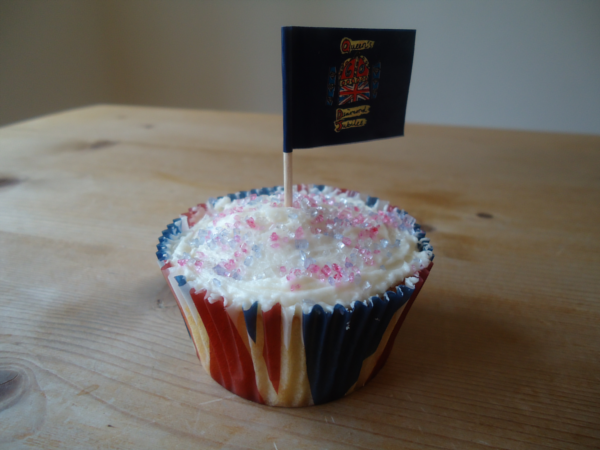
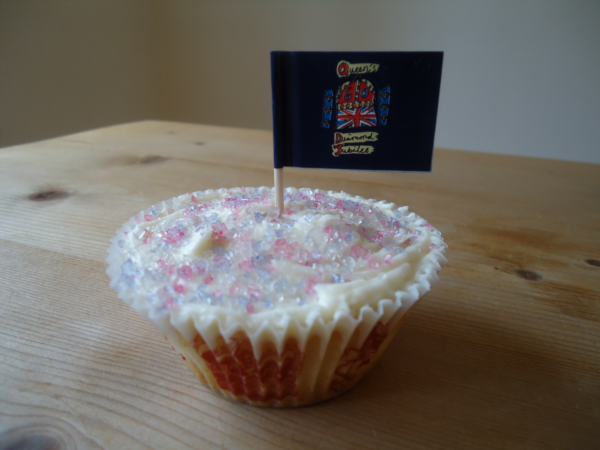
Whoaaaa it's been ages since I did a Foodie Friday post. Oops! Today is a special one to celebrate the Queen's upcoming Jubilee. A lot of people are having street parties, so if you're stuck for ideas of what to bring, I thought I'd provide a relatively quick and easy - but totally delicious - suggestion: Jubilee cupcakes!

I found this recipe somewhere on the Internet a couple of years ago but can't remember where. I've tried lots of different recipes and this is definitely my favourite, it makes the cakes so light and fluffy. It makes about 20 cupcakes, depending on the size of the cases you use. Speaking of cake cases, I found some Union Jack and crown cases in Lakeland recently which I highly recommend to make your cakes look even more Jubilicious!

Ingredients:

For the sponge
80g unsalted butter, softened
280g caster sugar
240g plain flour
1 tbsp baking powder
Pinch of salt
240ml milk
1/2 tsp vanilla extract
2 large eggs

For the icing
250g icing sugar
80g unsalted butter
25ml milk
1/4 tsp vanilla extract
Red, white and blue sprinkles

1. Preheat the oven to 190C/375F and line two cupcake tins with cupcakes.
2. Whisk together the butter and sugar until perfectly combined - it should look a bit like breadcrumbs. Add the flour, baking powder and salt and mix well.
3. Put the milk, eggs and vanilla extract in a jug and mix together by hand. With your whisk on a low speed, add three quarters of this to the dry ingredients and combine thoroughly, then add the rest of the mixture and whisk on a medium setting until smooth. It will be quite runny, more like a batter than your usual cake mix, but this is what makes the cakes so fluffy!
4. Spoon the cake mixture into the cases so they're about two-thirds full. Bake for about 20 minutes in the oven - but keep a close eye on them! If the cakes feel springy when you touch them, then they're ready. Leave to cool.
5. In a clean bowl, whisk the icing sugar and butter together until they look sandy (just take my word for it). Add the milk and vanilla extract, and whisk until the icing is light and fluffy. I usually like to do this for at least a couple of minutes. At this point you can add food colouring - red or blue, perhaps? - if you want to, but I chose to leave mine white.
6. Using a knife (or a palette knife, if you have one), spread the icing on the top of the cakes. Finally, add your sprinkles or whatever else you want to use to decorate your cakes (I used red, white and blue sugar sprinkles from Lakeland). I also added little Jubilee flags to each one.
7. Put your feet up and eat one of your delicious cupcakes - for, ahem, quality control purposes, of course!

Wednesday, 30 May 2012

Topshop War Paint

Just a quick post today to show you a fun, summery colour. Topshop War Paint is a bright red/coral shade that is almost, but not quite, neon. I wore this a few times last summer before I started blogging - it looks especially great as a pedicure colour. The formula is good; two coats for full coverage, although I did an unnecessary third coat.

As you probably know, the Queen's Diamond Jubilee is only a few days away so on Friday I'll be doing a themed Foodie Friday post, and on Sunday, Monday and Tuesday I'll be showing you themed manicures! I'm really looking forward to it, and I hope you enjoy them! :)