Showing posts with label crackle. Show all posts

Saturday, 4 February 2012

Barry M Croc Effects

I was browsing the Barry M stand in Superdrug the other week when I stumbled upon something interesting. I'm afraid I am pretty much over the crackle trend of last year - let's face it, it's been done to death - but now Barry M has brought out something much more intriguing: croc-effect nail polish.

It works much the same way as crackle polish but with a few key differences, the most obvious being that instead of producing a random effect, it creates a more uniform pattern on the nails. Here are the instructions on the bottle (or you can watch Barry M's video tutorial here):

1. Apply a thin coat of your chosen nail varnish.
2. Wait 1 to 2 minutes until nails are touch dry. Do not apply to dry polish.
3. Apply a thin coat of Croc Nail Effects.
4. After 3 minutes the effect will start to appear.

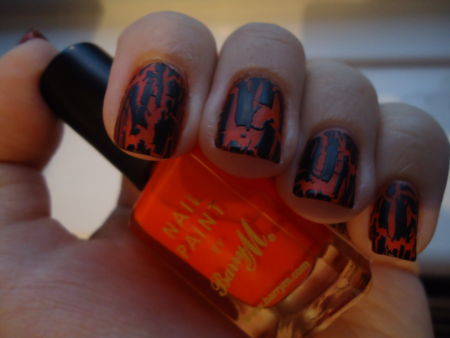
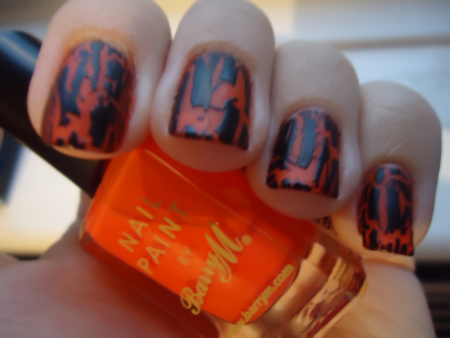
Probably the main differences between this polish and crackle is that instead of applying to dry nails, you apply it when your nails are still tacky. (In case you're wondering what happens when you apply it to dry polish, the answer is nothing. Absolutely nothing happens. You've basically just painted your nails black. Congratulations.) Also unlike crackle, the effect doesn't begin to show instantly - it does take a good couple of minutes for the design to materialise completely. I decided to try the croc effect over OPI Chocolate Moose, a pink-toned brown creme.

I found the croc effects polish was thicker than normal crackle ones, but it didn't cause any problems. It also dries much shinier than your standard crackle, but I'd recommend a top coat regardless to make it last longer. The size of the pattern varies depending on how thick/thin a coat you apply; the thicker the coat, the larger the pattern.

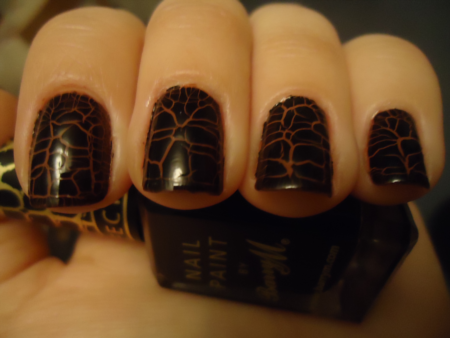
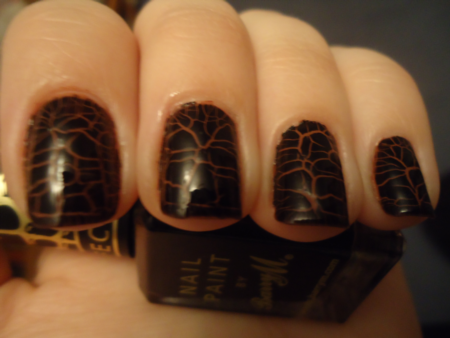
Overall, I really like this nail polish. It's a bit different to the tired crackle trend, and I personally think it looks classier. I got a lot of compliments when I wore it out. It cost me £3.99, which I think is very reasonable, and while it's only available in black at the moment I imagine Barry M will bring it out in more colours if it's popular. I can't say it exactly looks like crococile skin, though - it reminds me more of cobbles or a limestone pavement (can you tell my A-Level in Geography is kicking in?!). Still, if you want to try animal skin nails but don't feel your nail art skills are up to leopard or zebra print, this is an easy alternative.

Monday, 24 October 2011

A Simple Halloween Manicure

I'm pretty rubbish at doing facy nail art, so I was ridiculously excited at the beginning of this year when the crackle trend really took off. It's such an easy way of making your nails look a bit different without actually having to do any tricky designs. The first crackle polish I bought was the black Nails Inc Camden, and yesterday I decided to use it to make a very simple Halloween manicure that anyone can replicate.

I started off with a base coat and then did two coats of Barry M Block Orange. I've been a huge fan of Barry M nail polishes for years - they come in a wide range of colours and are actually very good quality given how inexpensive they are (£2.99 usually). I then did a coat of Nails Inc Camden and waited for it to dry thoroughly. I was going to use a standard top coat but changed my mind and used GOSH Matte Dry top coat instead to make it a bit different.

Usually I'm on the fence when it comes to matte nail polish, but I rather like how this turned out. I was going for just the standard orange/black Halloween colours, but I think it looks a bit like glowing lava oozing from a volcano, with the black crust forming on top as it dries (or is that just my overactive imagination...?). A surprising number of stangers told me they liked it today, so it's a win as far as I'm concerned!

Saturday, 22 October 2011

OPI Nicki Minaj

Look what I just saw on OPI's Facebook page:

Nicki Minaj inspired polishes!

From left to right: Super Bass shatter, Metallic 4 Life, Save Me, Fly, Did It On 'Em and Pink Friday

I don't quite know why I'm so excited about this as I've never really listened to Nicki Minaj's music, but the colours look pretty cool - especially Fly, as I'm partial to blues. None of them strike me as particularly unique at first glance, though. Metallic 4 Life reminds me a bit of Nubar Knights Armour, but it's difficult to tell from just a photo. I liked the Katy Perry collection from earlier this year (and, of course, it contained the Black Shatter that prompted pretty much every nail polish company to jump on the crackle bandwagon...not that I'm complaining), so I'll be interested to see how this one compares. The release date is some time in January.

Friday, 16 September 2011

OPI Dating a Royal & Silver Shatter

I love OPI nail polish. I don't think words can sufficiently express how much I love it. Yes, it's more expensive than some brands, but as far as I'm concerned it's worth the price tag. One of my current favourites is Dating a Royal, a bright blue that really pops and suits most skin tones. When I first saw this colour it reminded me of Kate Middleton's dress when she announced her engagement to Prince William:

I don't know whether the polish was intended to match her dress, but given how similar the two colours are - and the polish's name - it seems quite likely.

Anyway, I wanted to paint my nails with a bright colour but I also wanted something a bit more fun than Dating a Royal on its own - which is where OPI's Silver Shatter comes in. Part of the Pirates of the Caribbean collection (and my favourite of the six, although Mermaids' Tears, a mint creme, comes a close second), as the name suggests it's part of the recent craze for crackle polishes. It's silver with tiny glittery specks that catch the light beautifully.

Look how sparkly it is!

First, I used a base coat to prevent staining (my go-to one is Nails Inc Soho Silk because it creates a white base, which means your chosen polish goes on more opaque), then two coats of Dating a Royal. This was followed by a light coat of Silver Shatter. There are numerous instructional videos for applying crackle polishes, but to be honest it's not hard to figure out for yourself. The main thing to remember when applying it is the thicker the coat, the fewer cracks there will actually be in it. Wait for it to do its thing and dry, then followed with a top coat. Voilà!

Okay, my photography sucks (practice will hopefully make perfect) but you can still see quite well how it turned out. I got a lot of compliments when I wore it, including from several strangers.